
Are you looking to change your existing taps? Perhaps you want to create a new style, or maybe you require a change due to wear and tear. Bathroom taps are a staple feature for baths and sinks, so use our guide below and find out how to change yours with complete confidence.
Table of contents
How to change bathroom taps
Changing a bathroom tap doesn’t have to be a nightmare experience. In fact, with the right know-how, you can change your taps with simple steps. That’s why we’ve created some guidelines to help you.
How to change bathroom sink taps
You’ve chosen new taps for a bathroom sink; now it’s time to fit them into your basin!
Step one: Turn off the water at the mains supply for both hot and cold water
Run the taps in the house to drain any remaining water in the system. Confirm the mains supply is off and leave all taps in the ‘open’ position across the property.
Important: Leaving the taps in the ‘off’ position risks damaging them when turning the water supply back on after installing the new taps. This is because the air left in the system will typically come out first, followed by the water through the pipes and taps. The force from the pushed-out air can cause damage. Leave all taps, including the newly installed ones, in the ‘open’ position before turning the water supply back on.
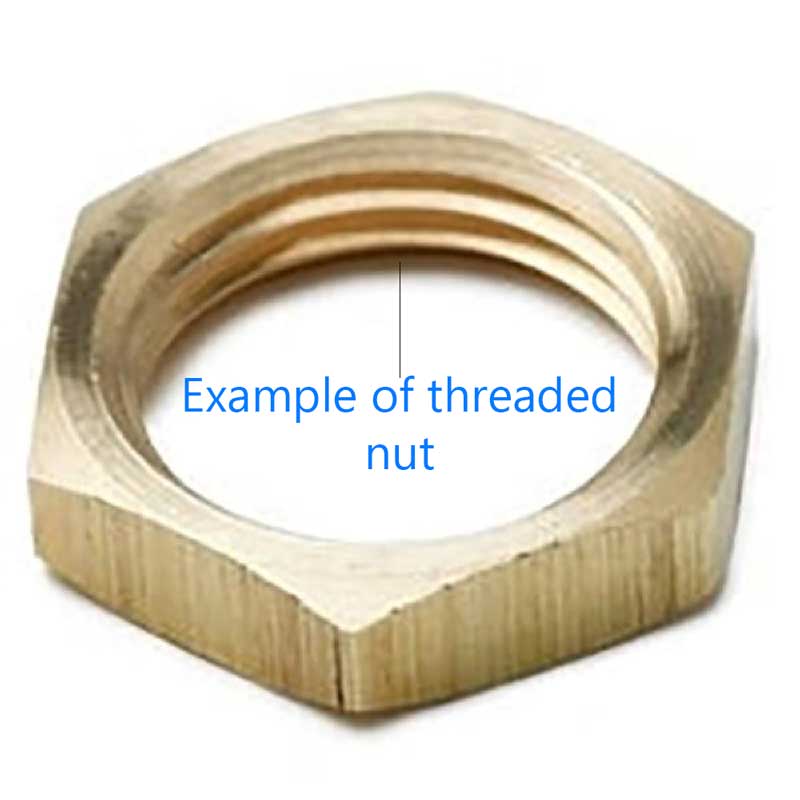
Step two: Go under the basin and use a wrench to unscrew the nut(s) holding the basin to the tap
Once this is done, you can gently lift and move the tap off the basin. Check that it is separate from the pipe system, too.
Note: If there is any old adhesive or dirt, or your pipe system is grimy, clean this area to remove any excess muck and ensure there is no damage to the fittings your new tap will be attached to.
Step three: Connect the threaded bar to the new tap
Feed this through the basin hole so that the tap sits on the top of the basin with the thread sticking out below the basin. If your new tap includes a washer, use this to secure the tap firmly in place (if this wasn’t part of the kit, then you may need to buy the washer separately). Now, put a nut onto the threaded bar to secure the new tap to the basin.
Note: If there are any issues with the fittings connecting to the old pipework, then you’ll need an adaptor. Fittings manufactured with plastic may need a connector, and monobloc (one spout) taps will need a reducing coupler.
Step four: Take your flexible connectors and screw this into your tap on one end
With the copper piping system in the other hand, add a compression fitting in between. Compression fittings can help regulate the pressure between the two pipes. This is safer than leaving them to run at random, so it’s advised to fit them where possible. After this, secure your tap to the basin and connect the hot and cold pipes from the wall to the new pipes.
Step five: Make final checks for issues such as damages, leaks or loose connecting sections
Once this has been completed, leave the new tap in the ‘open’ position as you did before with the other taps and then turn the water supply back on at the mains. If the stream of water is nice and steady, with both hot and cold working as needed, there you have it. A newly fitted basin tap!
How to change bath taps
Time for some new bath filler taps! Here’s how you can install them in your bath.
Step one: Isolate the bath water supply using a flathead screwdriver
Unlike basin taps, bath water suppliers can be isolated using a flathead screwdriver to turn off the hot and cold taps at the compression fittings. However, if the system does not have compression fittings, turn off the water supply at the mains and leave all taps ‘open’.
Step two: Look under the bathtub (if a panel is covering the system, remove it for the installation)
You should be able to see two flexible tap connectors leading from the internal plumbing in the wall to the tap. Disconnect them with an adjustable wrench and remove the tap accordingly by loosening and removing the nut from below the tap. Remove the washer, and the tap should lift away from its placement easily.
Note: If you plan to replace the connectors, remove them from the wall, the compression fitting (if applicable) and the body of the tap. Wipe up any excess with an old towel or cloth after removing the connector. Water may be trapped where the connector meets the bottom of the tap.
Step three: Clean away any surface dirt
This can be done with a wet cloth, before fitting your new tap(s) in the clean hole(s). Secure it with a washer and nut to create a watertight seal.
Step four: Make sure your taps are left open, then check everything is secure
There should be no loose or leaking sections after you’ve turned the water back on.
There’s your brand new bath tap!
How to remove a tap head with no screws
If you find yourself with a tap system that doesn’t have any screws securing it to the basin or bath (e.g., grub screws), here’s how you can remove it.
Step one: Turn off the water at the taps
Drain the taps of all water and leave them ‘open’.
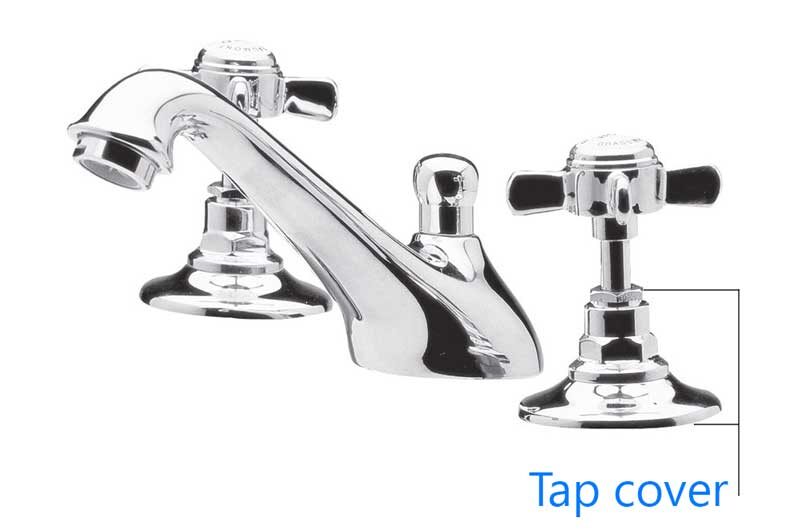
Step two: Loosen the taps from the tap cover
With no screws, your tap or taps are likely to be the type that unscrew from the tap cover (aka the hood). You can easily twist some off, but others may be fitted tightly in place. Once you’ve twisted the cover, ‘open’ the tap until it can ‘open’ no further. You can now continue to twist the cover until it is loose.
Tip: If the hood is difficult to twist off, cover the tap using a cloth to protect the finish and use pliers to help loosen it.
Step three: Remove the taps
You should now be able to see the nut beneath the cover and easily fit your wrench around it to begin the removal. If tight, use your pliers to hold the bottom of the tap beneath the basin. You should now be able to remove your tap(s) easily.
Step four: Replace any poor-quality PTFE/plumber’s tape/Teflon
If there is existing PTFE (Polytetrafluoroethylene), also known as plumbers’ tape or Teflon, around the bottom of the tap that’s in poor condition, it’s advised to replace this with new Teflon. Wrap it around at least five times, in the same direction that the tap will be fitted. If you need to replace the washer, do so as required.
Step five: Reinstall the taps
Ensure all sections are tightly fitted to avoid any leaking. Leave the taps ‘open’ to ensure they run smoothly and check beneath the basin so that you can be satisfied no leaks are coming from the main section of the piping system.
There’s your guide to unscrewing taps with no screws!
Please seek professional advice from a plumber or trade manufacturer if you’re still uncertain about the fitting process.

Was this guide useful?
Mentioned in this project guide:


